How to Photograph Fireworks

The 4th of July is right around the corner and that means barbecue, beer, and of course, fireworks.  There's no better way to celebrate the birth of the good ol' US of A then getting drunk with friends and blowing up a small piece of it.  If you live in a city, the odds are you'll have access to a pretty fantastic fireworks show.  Fireworks are a lot of fun to photograph in part because most of us only have two chances per year to shoot them - NYE and the 4th of July.  In this entry, I'm going to tell you what you need to get some great images.  What I'm going to describe is my workflow, which is by no means the only way to do it.   If you have a different method, that's awesome!  Feel free to post your approach in the comments.  Also, every shooting environment is different, so the following is being offered up as general guidelines.  Feel free to tweak things as needed.

Here's the equipment you'll need:

What you'll need

What you'll need

  • DSLR Camera with the ability to shoot in Manual Mode (M) or Bulb Mode (B) 
  • Lens - wide angle if you're close to the action, zoom if you're further away
  • A sturdy tripod
  • a cable or radio shutter remote (some cameras like the Canon 6D have a cell phone remote shutter app)

You're going to be doing some fairly long exposures, so hand-holding your camera is not an option here; every single little movement and tremor in your hands will blur the image.  If you're using a zoom lens, this will be exaggerated.  This is where your tripod comes in.  Avoid those cheap "travel" tripods as they tend to be pretty flimsy.  You want something solid to support your camera.  If you don't have a tripod available, you can set your camera on a solid surface, but you'll lose the ability to reframe a shot.  Do yourself a favor - buy a decent tripod.  Look at models around $75-$100.  For most hobbyists, this will give you great mix of stability, portability, and durability under normal conditions.

The long shutter speed is also the reason you're using a shutter remote.  To ensure a tack-sharp image, we need to eliminate all vibration, which includes the vibration from your finger pressing the shutter button.  Yeah, it's that sensitive.  Crazy, right?  The shutter remote will allow us to take the image while ensuring the camera is completely undisturbed.  You can pick one up on Amazon for $10 - $15.

When it comes to selecting your lens, your choice will largely depend on your particular situation . In an ideal context, you'd have access close to the action and a wide angle lens.  Wide angles are great for capturing big open skies and the lens distortion gives a cool surreal effect.  They also have a very large depth of field, so its easy to ensure that everything in frame is in focus.  If you don't have the luxury of close proximity, you'll need a zoom lens.  The important thing is to ensure that you have a field of view that allows you to broad depth of field.

Set up your gear

Get your camera and put it on your tripod.  Plant your tripod someplace where your camera won't get bumped or knocked over.  Remember, we're celebrating the birthday of 'Merica, dammit!  People have been drinking all day, and by sundown most of your stupid friends are bound to be a little clumsy.  When choosing your spot, stability is key here. Don't put it on soft dirt  or loose pebbles that are going to depress and shift as people walk around.  Connect your shutter cable or remote.  Don't forget to take off your lens cap.

Find your Settings

NOTE:  I've written the following assuming that you can balance Shutter Speed, Aperture, and ISO to get a desired exposure.  If this isn't the case, you can skip down to the "Quick and Dirty Method" under this same heading.

Your in-camera light meter should be visible through your viewfinder as well as on your LCD screen

Your in-camera light meter should be visible through your viewfinder as well as on your LCD screen

Once you have your camera on your tripod and everything set up, you'll need to get baseline exposure for the ambient light without the fireworks.  This can vary drastically based on city lights, a full moon, etc.  To do this, utilize your in-camera light meter set to Evaluative or Matrix mode (different names for the same thing - Canon and Nikon respectively).  This little guy lives inside your viewfinder and on your LCD screen.  When you depress your shutter button half way, it will tell you how close your are to what the camera thinks is a perfect exposure.  When the indicator is dead center, the exposure is correct.  When it's left of center, the image is underexposed.  When it's right of center, the image is overexposed.  For this shot, underexposing this base reading by about two stops will make all the points of light from the pyrotechnics really pop.  Balance the following elements so that the indicator is at -2. 


Shutter Speed

99% of the time, I recommend shooting in Manual Mode (M).  Doing so in this case will allow you to take full control over shutter speed, aperture, and ISO so that you can manipulate the image in-camera to your heart's content.  As I've already mentioned, you'll be using a slow shutter speed.  A long shutter speed will allow you to capture long light trails, rather than spots of light in the sky.  Also, the slower the shutter speed, the more fireworks you'll be able to capture in a single frame.  If you want fewer bursts, something around 10 seconds would be appropriate.  If you want a lot of bursts, set your shutter speed at something longer like 30 seconds. Now, if you're feeling adventurous and you really want to jam pack the frame with a metric butt-ton of fireworks, switch your camera to Bulb Mode (B).  This will allow you to hold the shutter curtain open as long as the remote button is depressed.

Set your camera to Manual Mode (M) or Bulb Mode (B)

Set your camera to Manual Mode (M) or Bulb Mode (B)

Aperture

 For landscape-style shots like this, you generally want as much of the frame in focus as possible.  I recommend starting around f/11 and bumping up the number until the whole image is in focus.  Adjust in small increments until the whole image is tack-sharp on the LCD when zoomed in at 100%.

ISO

I always shoot at the lowest ISO possible because higher settings introduce noise to the photo.  This is especially evident in entry-level crop-sensor cameras, like the Canon Rebel series.  Noise can be cleaned up a bit in post editing, but noise reduction always takes away from overall sharpness.  Start at ISO 100 and increase it until your light meter indicator is at "-2".  If the image is too bright, lower your ISO to underexpose a bit more.  If your minimum ISO places the light meter indicator at something higher than "-2", you'll need to  close your aperture or speed up your shutter speed to allow less light to hit the sensor.

Quick and Dirty Method

If you aren't yet at the level to balance out Shutter Speed, Aperture, and ISO, to get a desired exposure level, fear not!  You can put your camera on Shutter Priority Mode (TV on the shooting mode dial) and set a long shutter speed, and set the overall exposure compensation to "-2".  The way to do this will be different depending on your camera brand and model.  Please consult your camera's manual - if you lost it, check out the manufacturers website, and you can usually download a free copy of it.

Compose your shot

You're essentially taking a landscape shot here.  When taking landscape shots it's important to have three sections of your image: a foreground, a mid ground, and a background.  Having all three elements will give a sense of depth and place the viewer in the scene.  If you only shoot the sky, without a foreground and mid ground, the image lacks a reference for scope.  Now fireworks are generally cool enough that if you only shoot the sky, you'll still get decent pictures.  That said, if you can incorporate the near, the mid, and the far, you'll be a lot more likely to create a very compelling image.  

We're going to apply the rule of thirds here as well.  Draw an imaginary tic-tac-toe board on your frame and place points of interest along those lines with emphasis on the intersections.  If you want to emphasize the sky, put the horizon line on the bottom third.  If you want to put emphasis on the ground, to point out an iconic building or landmark, put the horizon on the bottom two thirds of the frame.

Shooting 

Now, just wait for the fireworks and shoot, stupid!  If you find that your exposure is too bright adjust your settings as necessary to tone it down.  If the exposure is too dark, adjust to lighten the exposure.  Take a lot of images - most of the pictures are going to be mediocre, but you'll come across a handful that are truly stunning.  Those are the keepers.  


A few parting tips...

Scout out your location early.  To get a good spot, you may need to secure a spot before crowds arrive.  Placing a reasonably sized blanket (5'x5' - anything larger is obnoxious and asshole-ish) is a good way of letting people know that's your space.

Fireworks love Clarity. If you're using a program like Adobe Lightroom or Photoshop to edit your images, the clarity slider increases mid-tone contrast and will help those fireworks really pop.

Bring a spare Battery.  Long exposures and constant fiddling to find the right exposure can drain your battery.  

If your foreground is moving use a flash.  Long shutter speeds will blur out moving objects in the foreground.  If you want to maintain a long shutter speed while freezing foreground objects, use a second curtain flash.

Don't be anti-social!  Like I said, most people only get 2 chances per year to photograph fireworks.  It can be tempting to go heads-down into your LCD screen and  focus on that all night.  Remember, holidays are meant to be spent with family and friends - not your camera.  Use the camera to capture memories.  Do not let the camera prevent you from making memories.


Wedding Bells

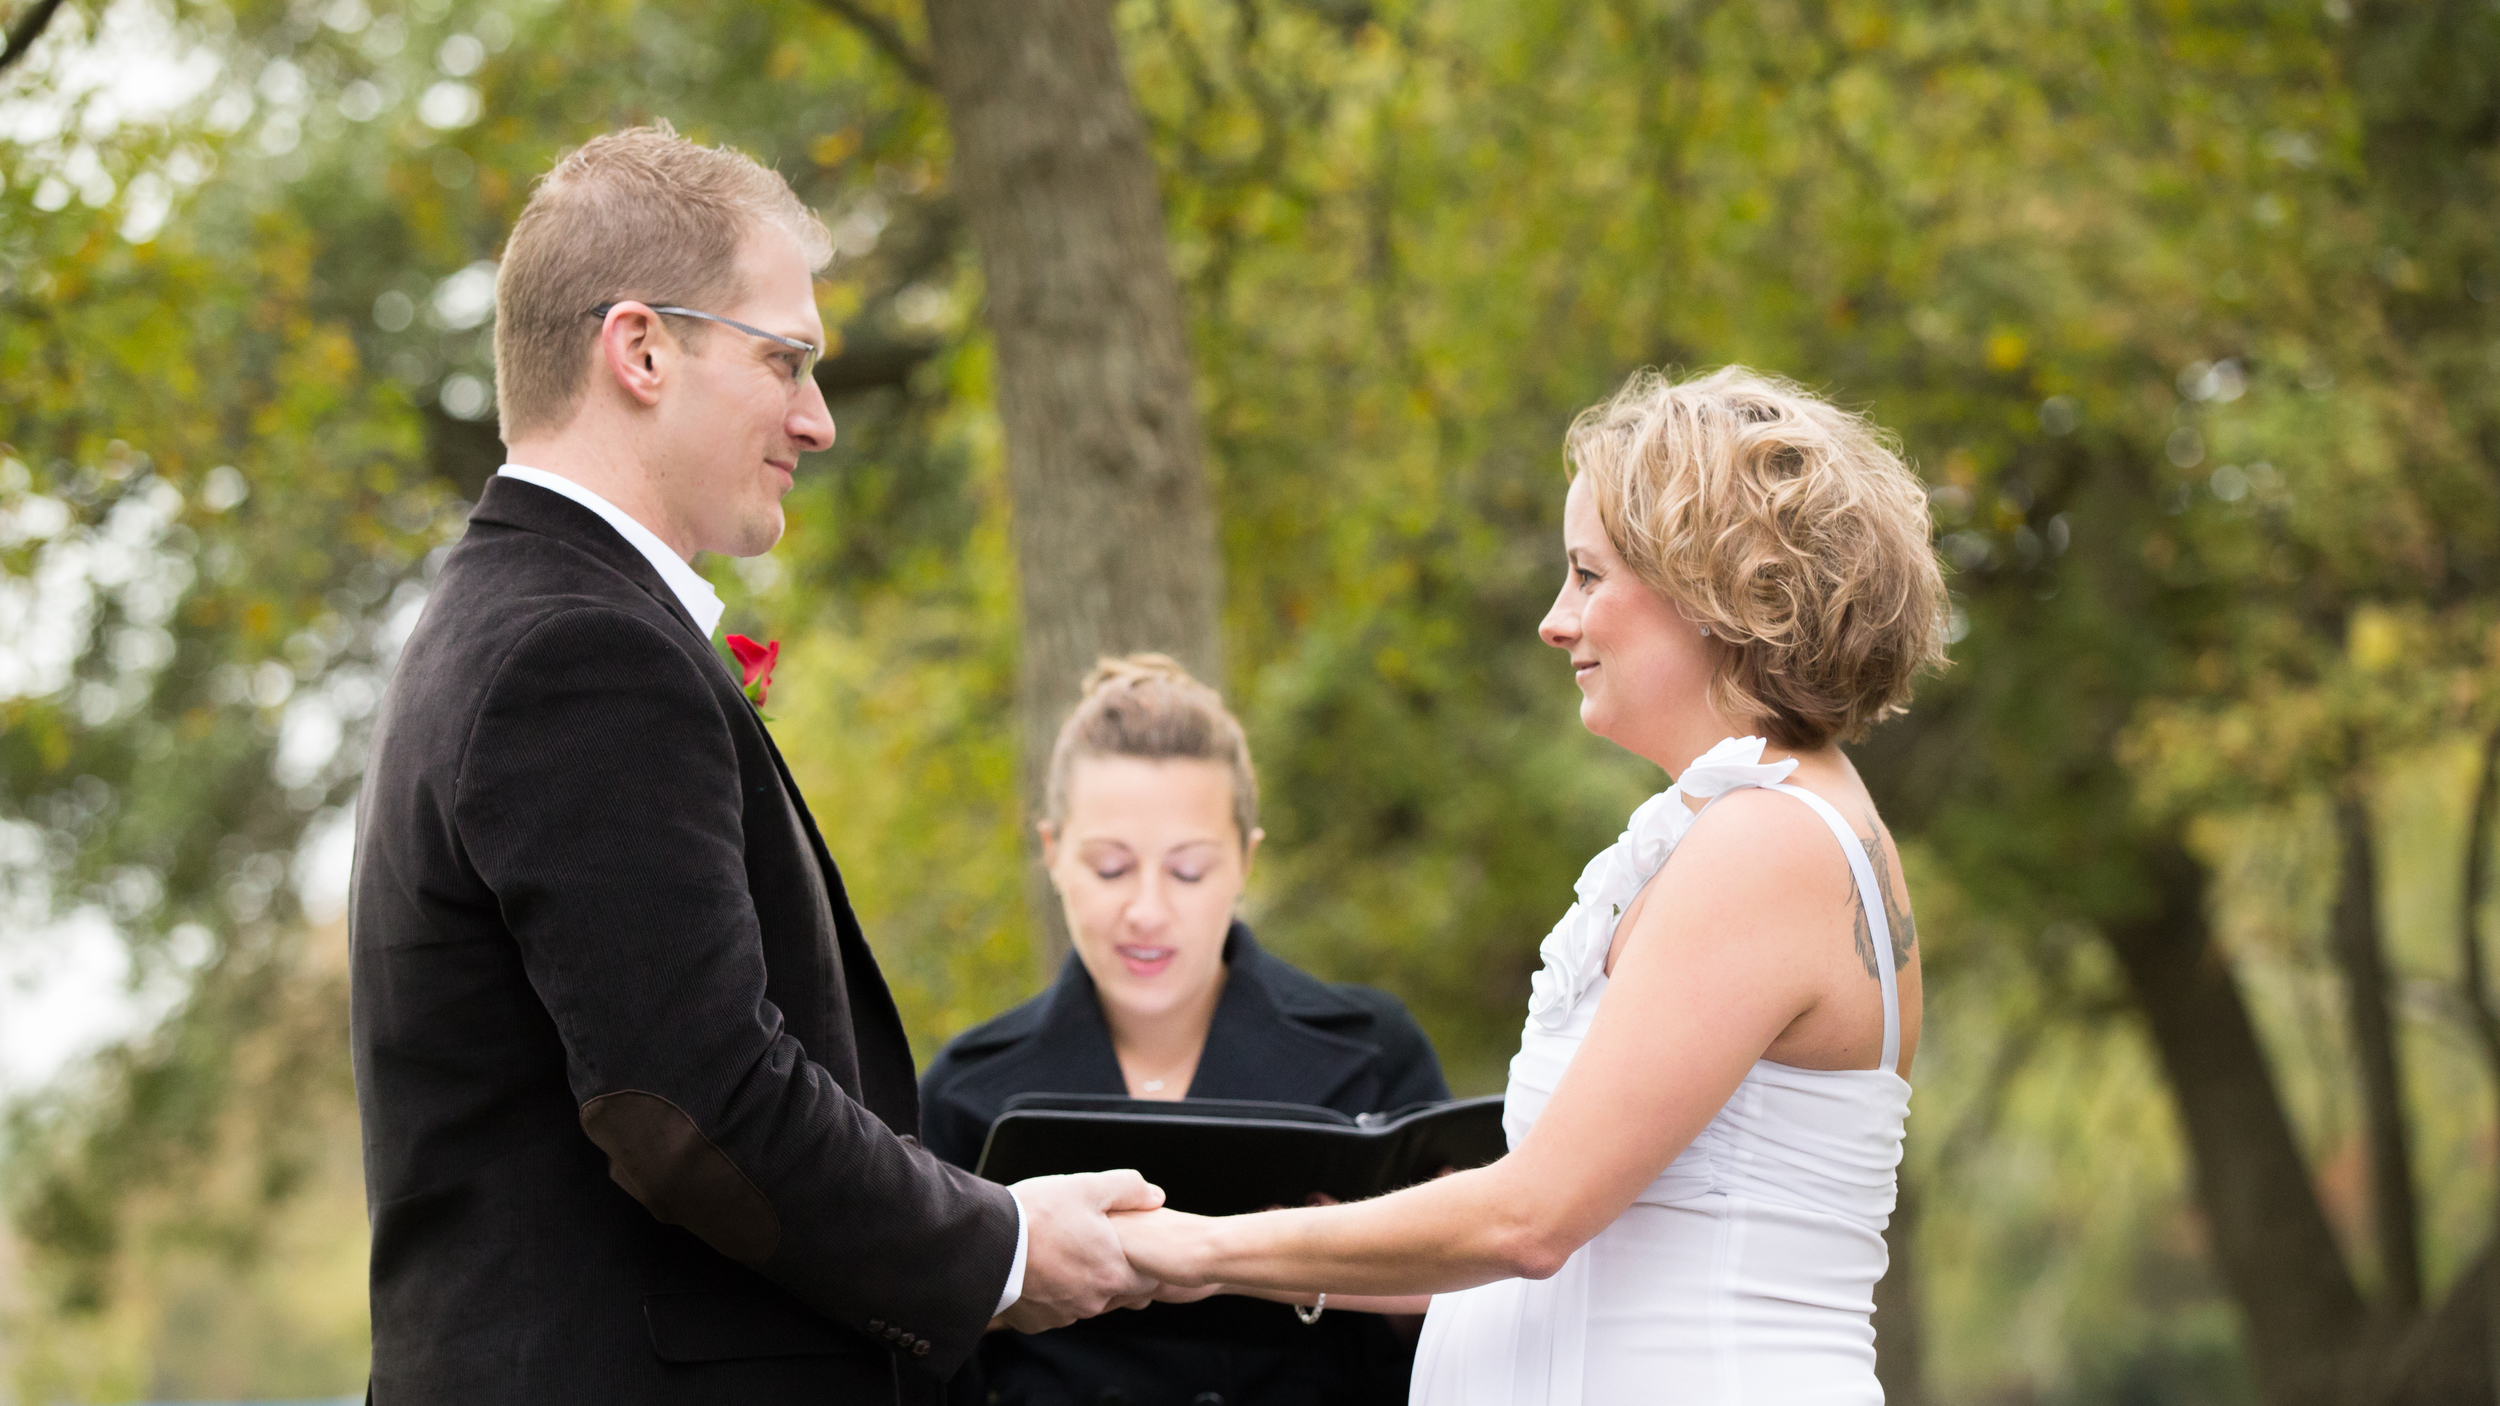
On November 16th, two good friends of mine, Lucas and Renee, got married and I was lucky enough to have been asked to shoot the event.

Wait a minute, Matt!  I thought you didn't shoot weddings?!

You're right, I generally don't.  Weddings are the bread and butter for many photographers, but I usually avoid them.  People tend to put so much pressure on a single day being absolutely perfect that this suffocating cloud of stress hangs over the event.  People spend exorbitant amounts of money and scramble to ensure every minute detail is attended to - and usually, at least one major argument breaks out behind the scenes.  I like to capture the essence of people.  During many weddings, that essence is obscured by the stress of the event.  

This was not that kind of wedding.  Renee and Lucas are two of the most genuine people I know. They are warm and caring with a get-shit-done mentality.  They treasure ceremony, but not spectacle.  They cut out the distractions so they could concentrate on the friends with whom they were sharing the day.  The event was bare bones and it was one of the best weddings I've been to.  This is the type of wedding that I jump at the opportunity to shoot.

The event was outside on a cold grey afternoon.  The temperatures were in the high 40's and a fine drizzle came and went throughout the day.  While not the most beautiful day, the conditions weren't bad for shooting.  The clouds turned the entire sky into a giant soft box and so the light was incredibly soft and flattering.  Unfortunately, the clouds were also thick enough that not much light penetrated.  I was grateful for the low light performance on the Canon 6D.

Lucas&Renee-9.jpg

The ceremony was only 5 minutes long and there were a lot of moments to capture.  To get as many as possible, I was on my feet the whole time leveraging the zoom on the 70-200mm f/2.8.  If you're adjusting your focal length a lot, it's easy to lose track of your shutter speed.  You always want to ensure that your shutter speed is at least as fast as the inverse of your focal length.  For example, if you are shooting at 50mm, your shutter speed should be at least 1/50th of a second.  If you go any slower than that, you risk blurring the pictures due to camera shake (here's a great video explaining camera shake by a rotund, yet charming Englishman -> https://www.youtube.com/watch?v=s2b62BJIw5c).  To avoid camera shake, I locked my shutter speed at 1/160th of a second to cover the full range of the zoom lens (image stabilization on the lens gives me 2 stops of compensation but I prefer not to push the limits).  My aperture was as open as possible to keep the subjects in focus, and I set my ISO to auto.  At times, it pushed upwards towards ISO 12800.  Going with a higher ISO can add a certain amount of unwanted graininess or noise to the images but with the general small cozy vibe of the wedding, the grain helped foster an older vintage feeling.

Post editing work was a bit heavier on this set than on most.  The background was darkened about half a stop and the highlights were dropped fairly dramatically.  In addition, the color temperature of the background was warmed significantly.  This accomplished two things.  First, it served to separate the subject from the background.  Second, the warming of the background color temperature gives the impression that the weather was nicer than it actually was that day.  The color temperature coupled with the softening of the image from the fine mist of rain that was coming down, gives more of a dreamy feeling as well.  Normally, I prefer to minimize post editing so that the image is as representative of the reality as possible.  However, at times, editing the photo to better reflect the feeling of a moment paints a more accurate reality.

This shoot was amazingly fun and I'm grateful I was asked to be a part of the couple's wedding day.  The bride and groom are awesome people and they left me to my own devices to come up with images.  The low-stress, joyous feeling of the day shone through in every single frame, making my job incredibly easy.  The event reinforced the importance of one of the single most essential rules of photographing people:  capture the emotion.  If you're shooting the right people in the right environment, that's a joy to accomplish.


Health Watch Austin Fitness Shoot

A local television producer had reached out to me interested in promotional photos for a segment on the show Health Watch Austin (www.healthwatchaustin.com).  The segment focuses on basic strength exercise that anyone can do and it is hosted by Jen Wireman.  

Jen is an ACSM certified personal trainer, Texas Rollergirl ("Big Nasty" #8, of the Honky Tonk Heartbreakers), and one of my favorite models to work with.  She's incredibly comfortable in front of the camera and her athletic/ballet background give her an acute awareness of what her body is doing.  She practically poses herself and that makes shooting with her very easy.

You should have a go-to model like this.  When you don't need to worry about your model, you can concentrate more on the lighting, composition, and other elements of the photograph.  Freeing up that bandwidth also makes perfecting new techniques immensely easier.  If you're still trying to find your go-to, dancers and gymnasts make especially great subjects.  They've spent countless hour drilling very specific body movements that were designed to be aesthetically pleasing and the performance aspect give them great presence in images.  

Achieve a stronger presence by having the model take up as much space as possible.

Achieve a stronger presence by having the model take up as much space as possible.

Thrilled that I'd be working with Jen again, I agreed.  The producer wanted to project physical strength and gave me free reign within that concept.  His one stipulation was that he didn't want Jen promoted as a pretty face.  Jen is an amazing athlete and a dedicated trainer and we didn't want to portray her in any way that would be reductive.  

The first half of the shoot was indoors.  Normally, when posing women, the body is angled in order to give a slimming, daintier effect. To convey a sense of power, I kept Jen square to the camera. Having your model take up as much space as possible in the frame also gives a larger presence.  

The other element I used was lighting.  All images for this job were lit using a single Canon 430EXii Speedlite through a Westcott Rapid Box 26" octa soft box.  The smaller source created harder shadows, accentuating her muscles, but it was close enough to be flattering on the face.  Turning her face towards the light causes shadows on the close side, really highlighting her cheekbones.

Small light source placed at a more extreme angle to emphasize the shadows created by muscles.

Small light source placed at a more extreme angle to emphasize the shadows created by muscles.

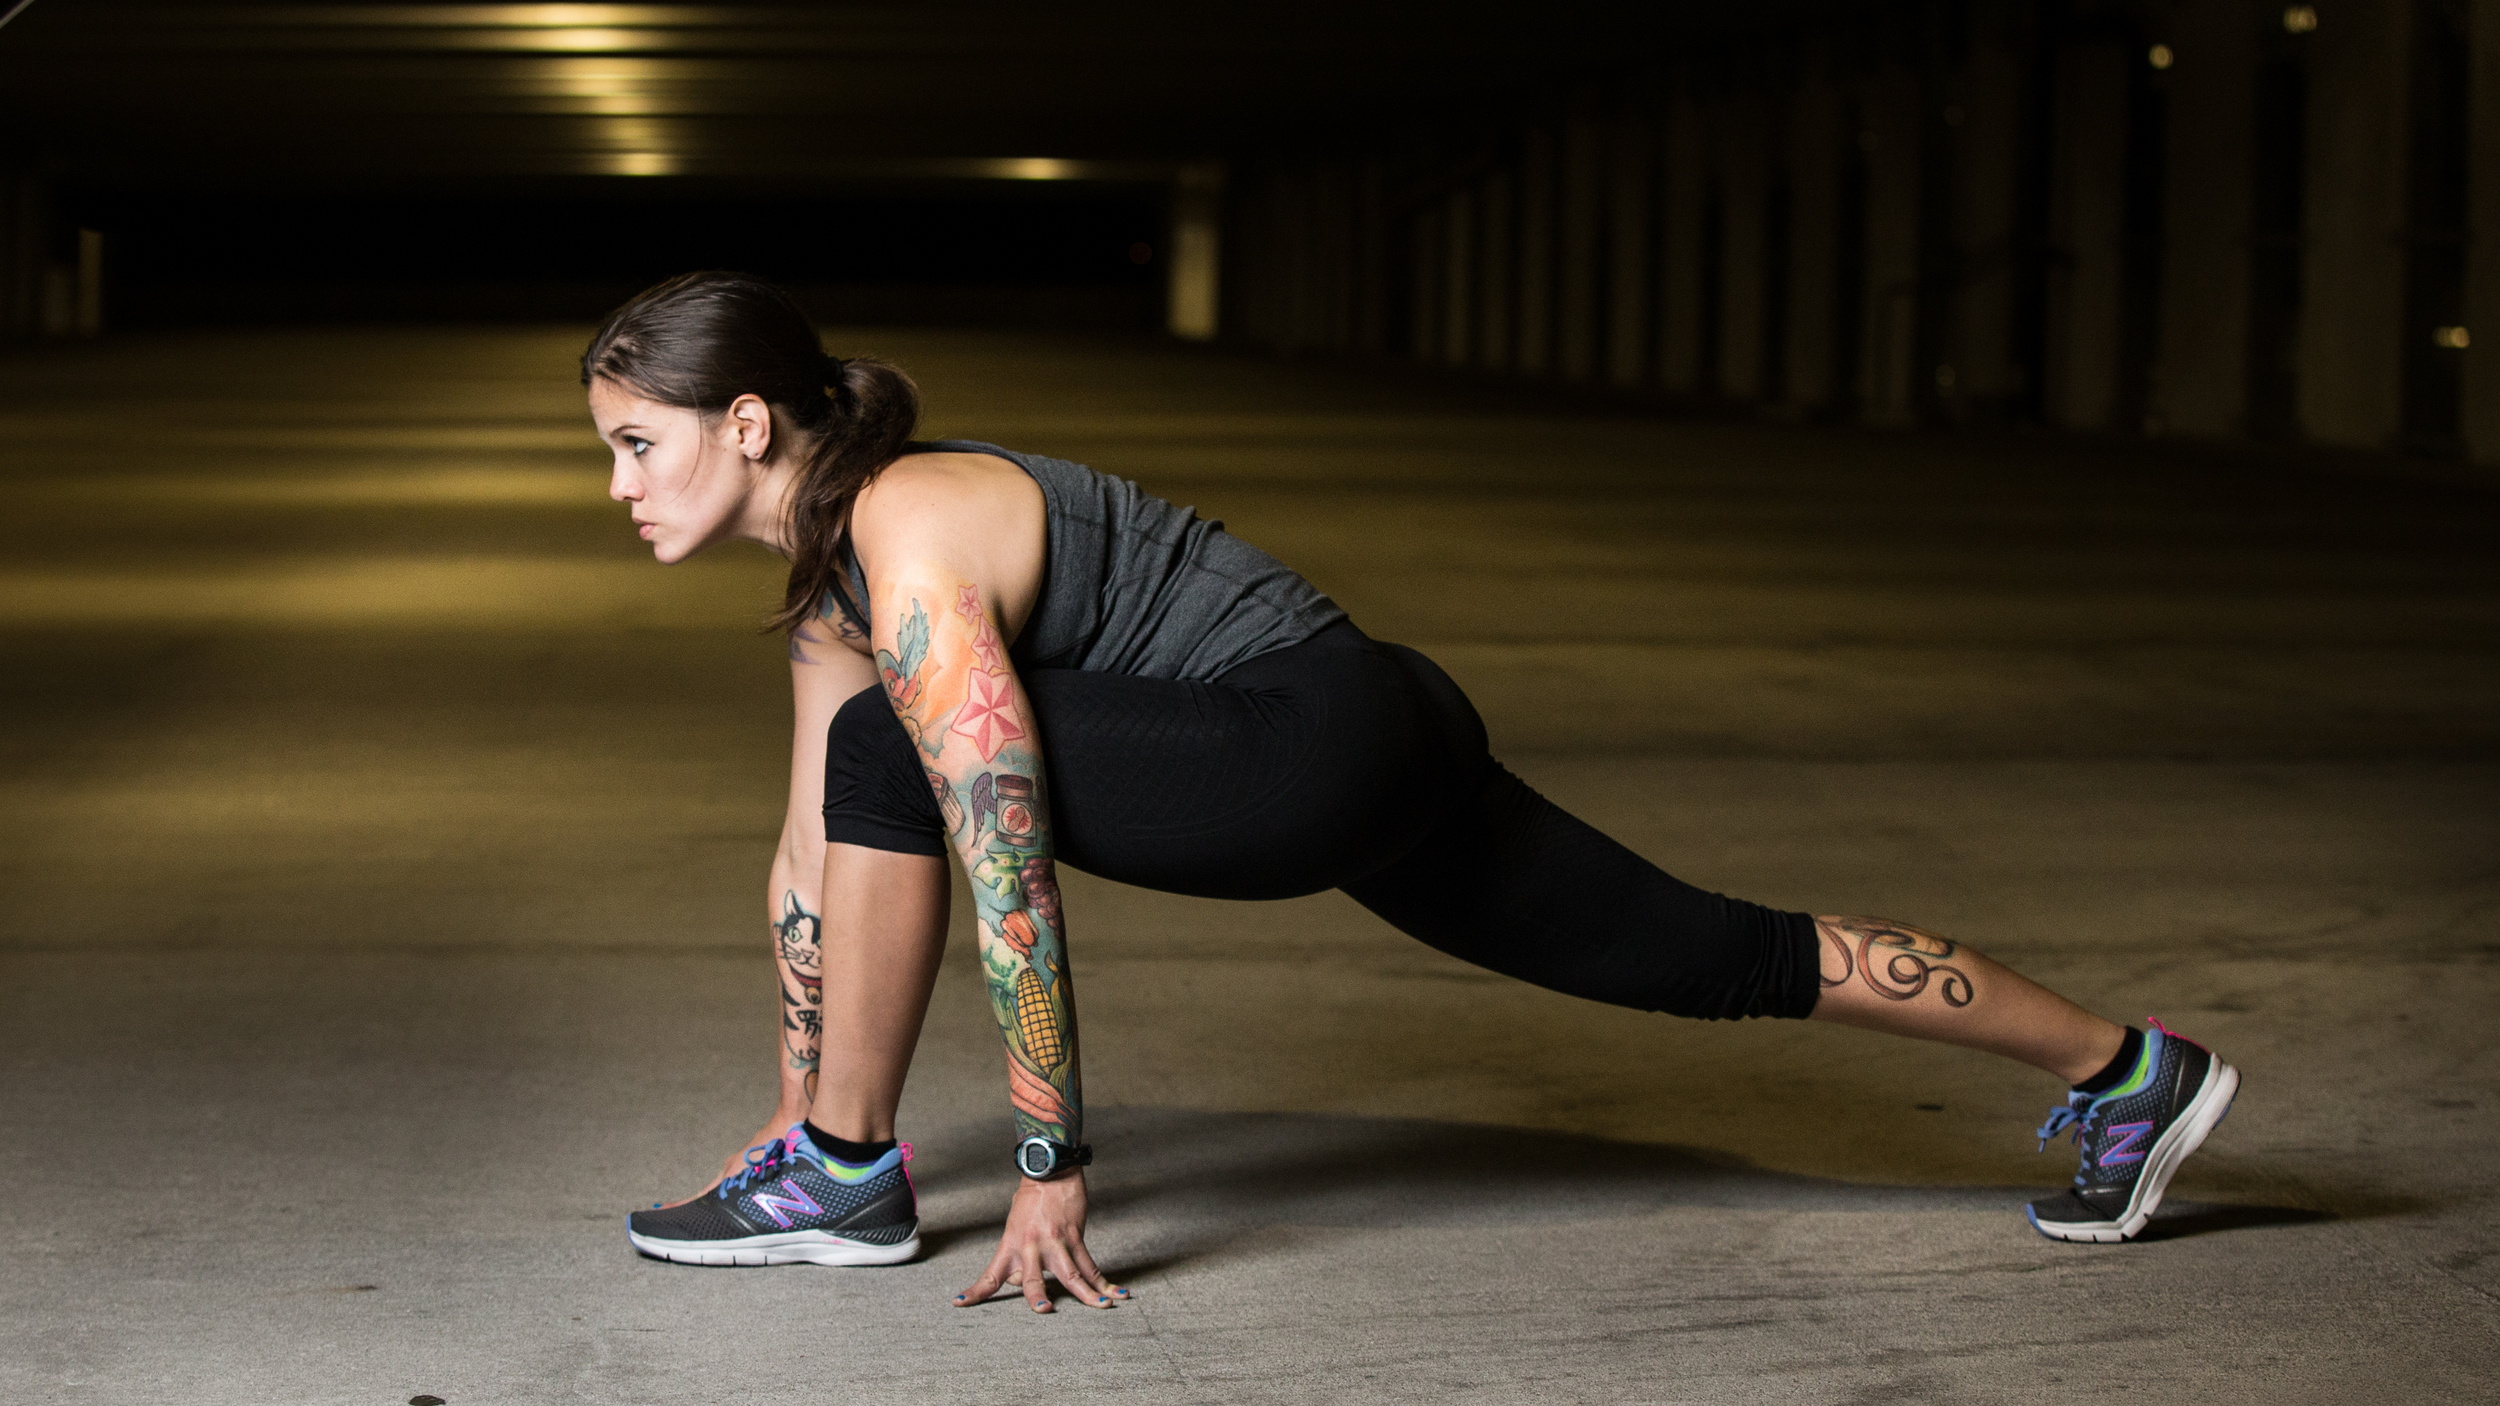
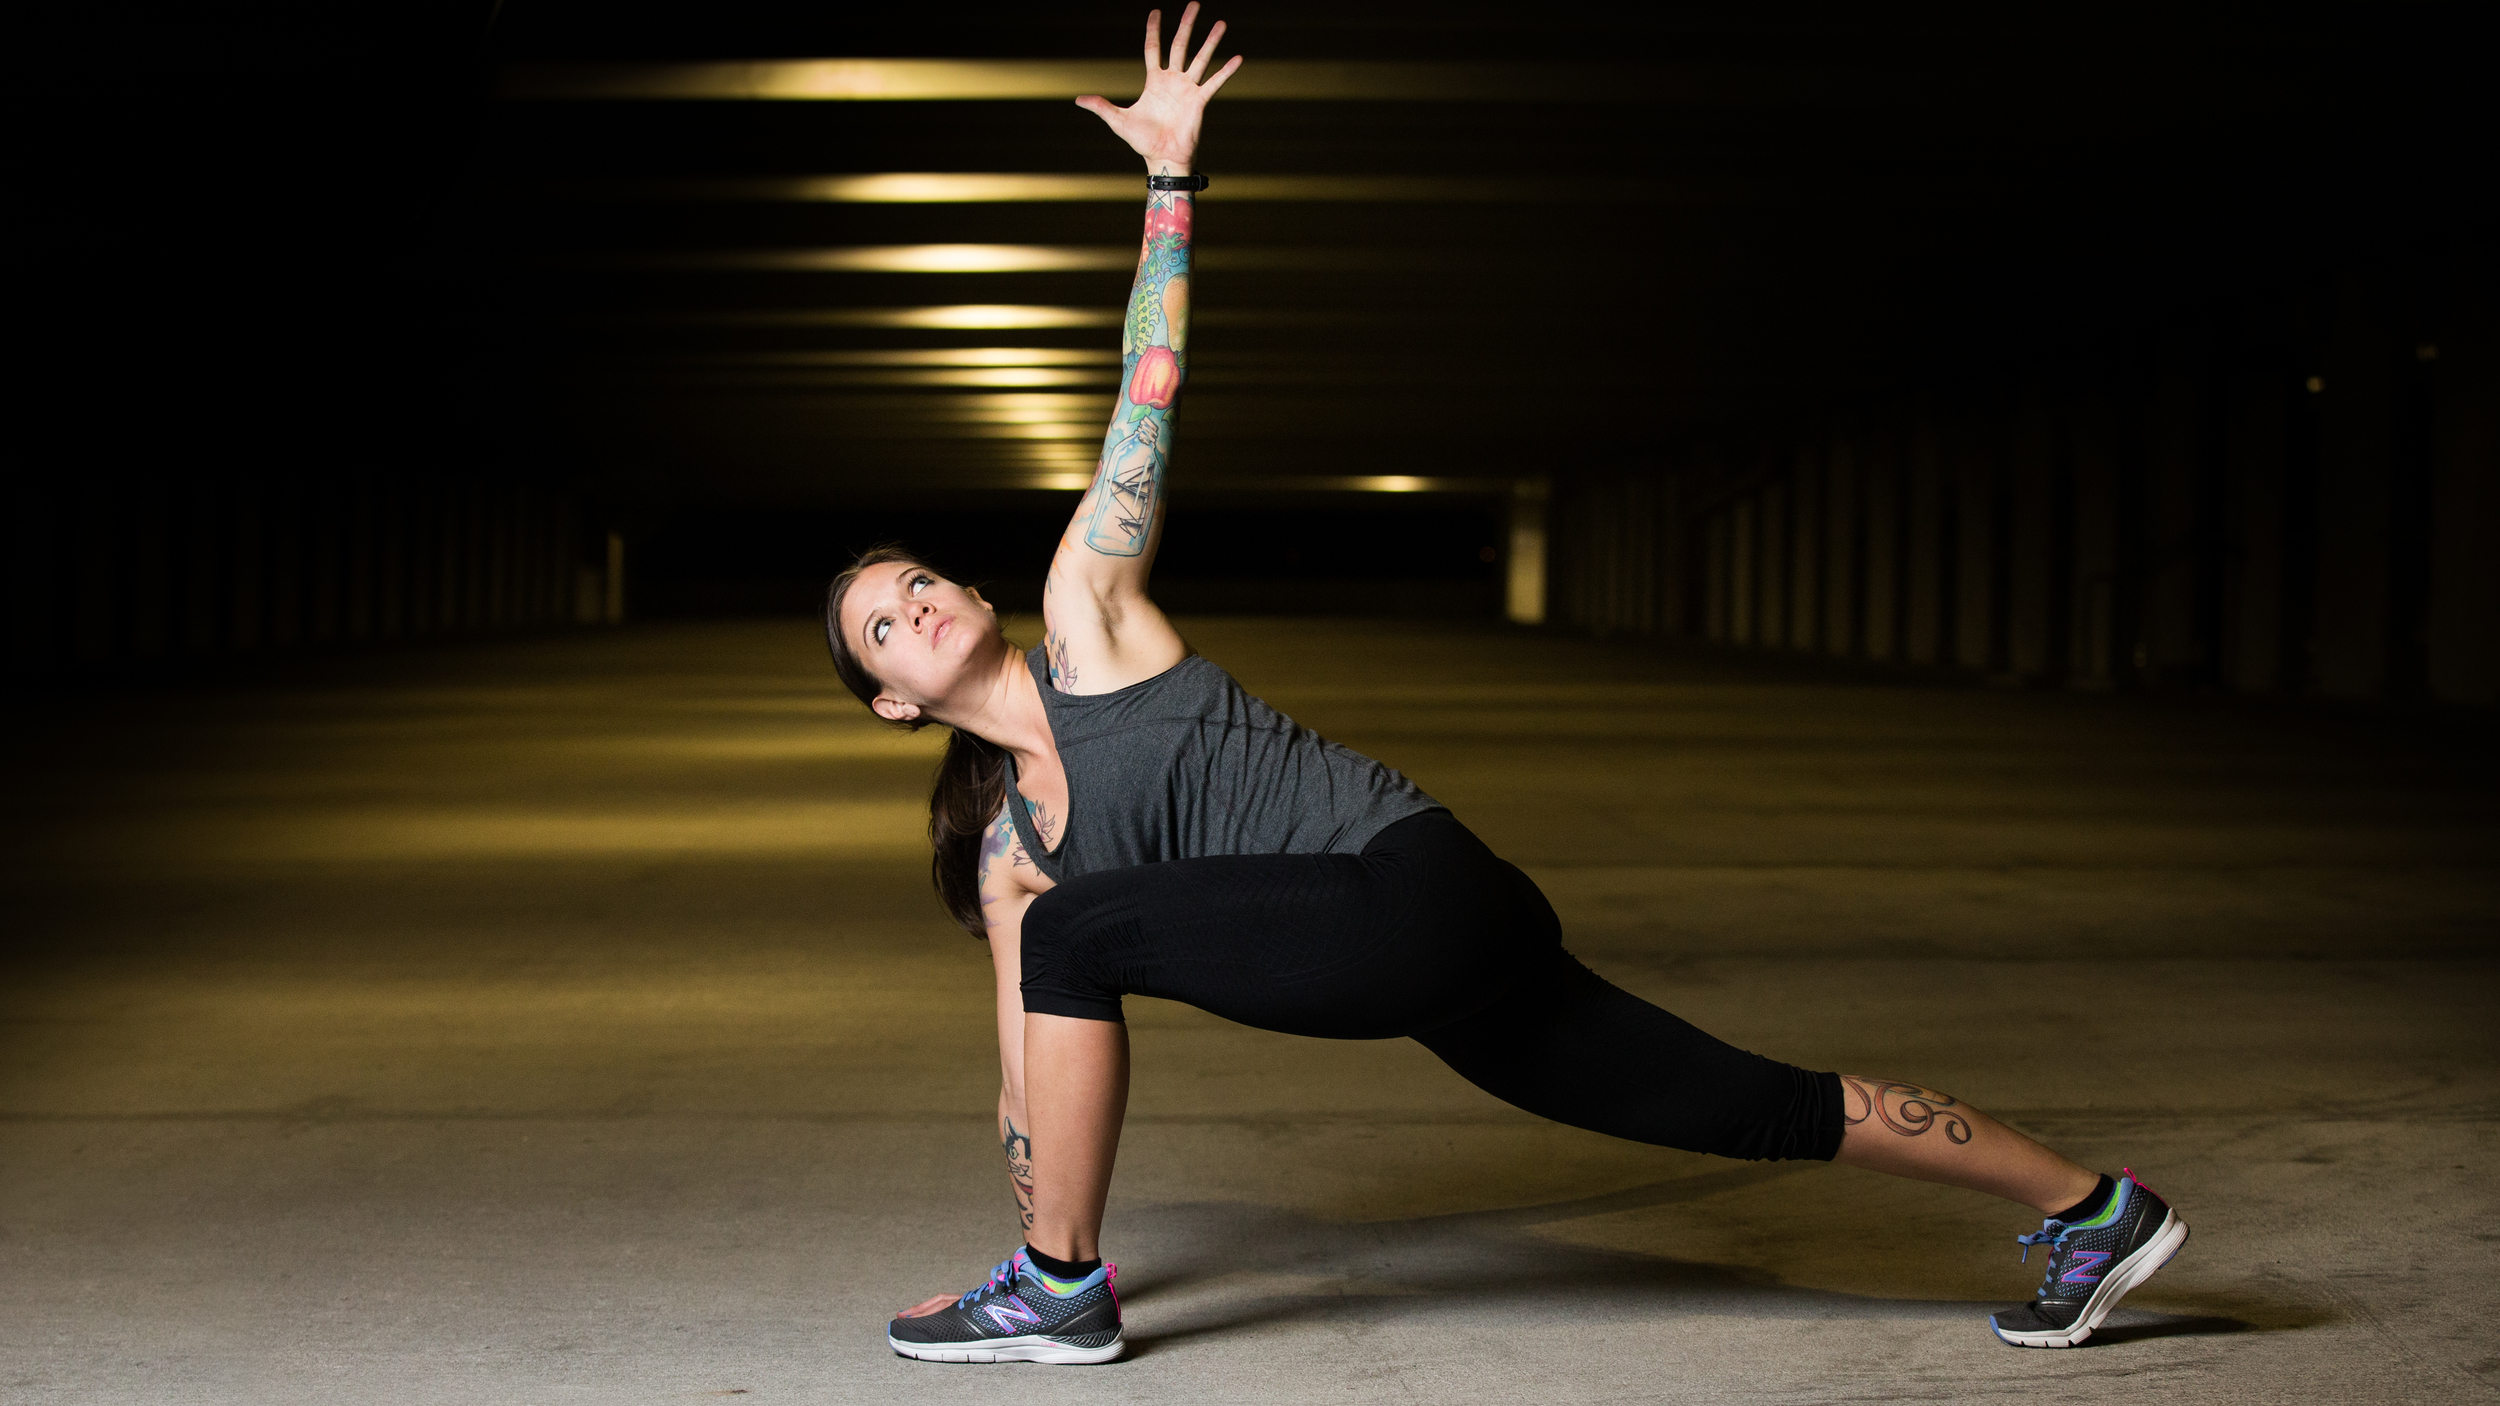
The second half of the shoot was my favorite part.  It was on location in the parking garage of an office complex in town and was chosen for its accessibility and its industrial feeling.  The cold, hard concrete and the harsh utility lighting were fantastic!  It rang of more of Fight Club than high-fashion fitness clubs and was chock full of recurring shapes and leading lines.  This dynamic environment was important because I wanted to ensure that the focus was on the feeling of strength rather than Jen, herself.  If you use a model to try to demonstrate a concept, it's an easy trap to fall into to when the attention focuses on the model, rather than the larger concept.  A good environment will distribute that focus throughout the image helping to prevent that pitfall.

Consider your environment when demonstrating a concept to prevent your model from stealing the show!

Consider your environment when demonstrating a concept to prevent your model from stealing the show!

In the garage, just as in the studio, I was shooting the Canon 6D with the 70-200mm f/2.8 and lighting with a single 430EXii Speedlite through the Westcott Rapid Box.  Before Jen stepped in frame, I set my exposure for the background, increasing the shutter speed to drown out the ambient light.  When I had that at a level I was happy with, I added Jen and used ETTL to light her.  Again, I kept the light at a more extreme angle to create those shadows to carve out the jaw and emphasize the calves. 

Normally in a such a dark environment, I would use a second flash as a rim light to separate Jen from the background a bit more.  In this case, I opted against it for fear that highlighting the curves of the lower half of the body would draw too much focus to the model.  Instead, I used the color temperature difference between the light of the garage lights and the Speedlite to separate the subject from the background.

After being imported to Adobe Lightroom, the images were minimally retouched.  Some exit signs were removed using the healing tool, and the background highlights were brought down and the edges were darkened to create a natural vignette.  In addition, a bit of clarity was applied to Jen's tattoos (every single one of which has a story).  

This was an immensely fun shoot.  It was the culmination of lighting, environment, gesture to convey a concept of Strength.  It was the perfect balance of technical and creative challenges that were interesting enough to pique attention, but not frustratingly difficult.  I was able to work with a great model in a perfect location.  Using some simple lighting and composition techniques, I got some very powerful images and most importantly, the client was happy.  

Make sure you catch Jen on Health Watch Austin Sundays on KVUE in Austin, Tx. as well as on the track once the 2015 season of the Texas Rollergirls starts.  Tickets are available at TexasRollergirls.org.